

Machine: ALL STs, STEs, TT & FALCON IN ST LOW RES, 1 MBYTE MIN RAM REQUIRED
Price: Ł69.95
From: Microdeal
Contact: 0726 68020
At last there is a simple to use, multi-media application that can be used with a standard ST or STE, and it doesn't cost the earth. The chaps at 2-bit Systems have been working late into the night to bring you the complete Desktop Video editing kit.
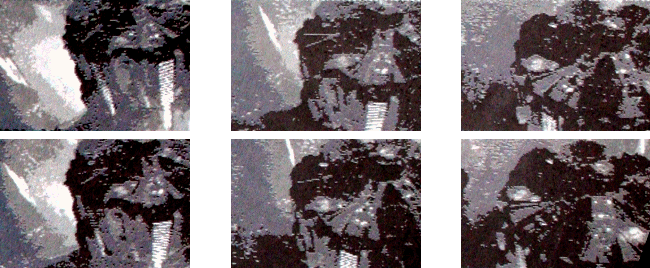
This amazing piece of kit can grab pictures from a video source at up to 25 frames per second from a live or recorded video source, albeit in quarter screen size chunks. Not only does it grab the video, you can actually grab the soundtrack at the same time! This means that the Copyright Act is likely to be broken left, right and centre as people start making demos nicked from TV, videotapes and laser disks.
You're not going to be surprised to find out teat the Videomaster comes in the now standard L-shaped cartridge so beloved of cubit Systems, as used for previous 2-Bit samplers Such as Stereo Replay and Replay 16. The cartridge is very heavy compared to earlier devices and if you look inside you can see a packed circuit board with no room Spare for even one more chip. Input for both video and audio is by means of standard phono sockets, with two controls to adjust the contrast and darkness (or brightness, to the rest of us) levels. Apart from the leads connecting to the Video source, that's all there is to the hardware side of Videomaster. See the Connections box below.
Use a VCR as a video source or, if you have a satellite dish or cable TV, you can grab directly from any channel which you can record on your VCR - simply turn your VCR to the appropriate channel that you normally use to record satellite programs. Alternatively you could digitise games from another computer as long as you use the composite video output of the machine you wish to make grabs from. Videomaster can make grabs from any composite video source.
There are two versions of the digitising and editing program on the Videomaster disk, one for the ST and TT and a slightly different version for the Falcon. The main difference with the Falcon version of the program is in the full screen section, Instead of a selection of options to create Spectrum 512 pictures from separate red, green and blue grabs, the Falcon version has a true colour merge option. The rest of the program is identical to the ST version.
The program runs in ST low resolution only (320 x 200) on all machines including the Falcon, so you need a colour TV or monitor, When you run the program you are presented with the video card, this consists of a quarter-screen size video window on the top left, a sample window along the bottom of the screen and a bank of controls on the top right, Also at the top right above the controls is a choice of four ''tabs'' similar to those found in a card index file? These are used to Switch between work screens.
The main program can capture mono real-time video from any video Source at a quarter-screen side, mono full screen grabs from a still video source or a video camera and colour full screen grabs from a video camera using the supplied red, green and blue filters.
Connecting to a video source is easy, most VCR’s have either SCART (Syndicat des Constructions D’Appareils Radio Recepteurs et Televisieurs) or phono connections as standard for audio and video input and output. If you have a SCART socket on your VCR, you need a SCART to phono lead, you can get one of these from Maplins Electronics (0702 554161) for Ł8.95, part number JW38R. For VCRs with phono connections, a simple twin phono lead is OK for the job, Maplins have a 1.5m lead for Ł1.20, part number RW50E. Oh yes, the cartridge is simply plgged into the cartridge port (where else?) on an ST, TT or Falcon.
STF WARNING: Remember your machine must be switched Off when inserting or removing any cartridge otherwise you may cause severe damage to both your ST and the cartridge.
There are just a couple o aspects fo the software that could have been improved, and a few extra functions added. The video editor could do with a Move Block option, a Save Block option and a Load and Insert Block option to enable previous clips to be imported into the one you are editing. You can insert single screen shots into a clip or added at the end, it can be time-consuming to save a single frame from one clip and add it to another. An option to save and load video clips as Deluxe Paint animation files would also be good. Saving the quarter-screen grabs at their original size would also be useful – at the moment they are automatically expanded to full screen size which gives a blocky appearance to the saved picture. An electronic RGB splitter to enable full colour grabs from video and TV would also be a boon.
The video card
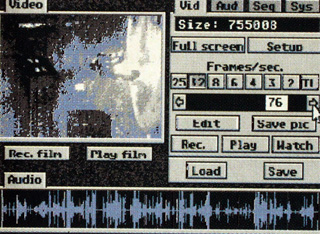
This screen controls the grabbing of pictures into Videomaster, both full screen still grabs or quarter-screen video. Most of the functions are obvious; under the main video window are a couple of buttons marked Rec Film and Play Film, these controls capture and play back sound and vision together, The bar at the top right that is marked Size displays the amount of RAM used by the clip in memory, and acts as a guide for saving purposes.
The two buttons below the size bar flip to the full Screen grabbing menu and the setup menu. Next are a line of buttons which select the number of frames per second for both recording and playback. The next item is the frame counter, the slider in this scroll bar enables you to move back and forth through the clip in memory. Edit takes you to the editing screen and Save Pic enables you to save the frame in three formats - Degas, Neochrome and IFF - while the next three buttons enable you to Record, playback or watch the video source without Sound. The last two buttons enable both film and video files to be loaded and saved to disk.
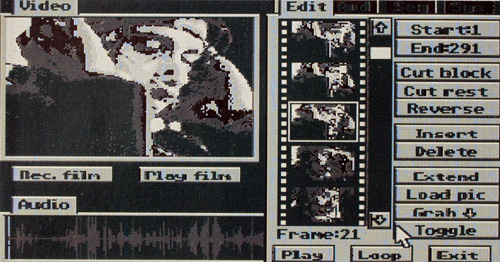
The video editor
This screen is accessed by clicking on Edit in the video card menu, and it’s where you can edit the clip in memory. The centre picture in the strip of film is the frame being displayed in the main video window. From here you can chop your clip about, removing unwanted frames, revising sections and deleting blocks as you like. It is also possible to insert frames from fisk in Degas, Neochrome and IFF formats as any point in the clip. Single frames can also be grabbed “off air” from video source and inserted directly into the clip.
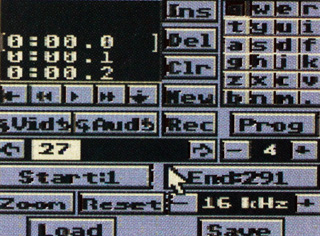
The audio card
This is a sound sample editor within the Videomaster program; as well as being able to edit sound recorded from your video source you can load samples from disk to add sound effects to your film or video clip. All the normal sound sample functions are supported; reverse, clear, zoom, squash fade and volume can all be adjusted and a good range of sound sample formats are supported. Sound can be sampled at rates between 1KHz and 16KHz – obviously the higher the sample rate, the better the sound quality. However, hisgher sample rates take up more memory so it pays to experiment to find the right rate for your needs
Videomaster has an almost sculpted look about its interface and looks rather attractive. The long black box at the bottom of the screen with the grey waves in is the audio window which displays the sound sample in memory.
There is a PD player program supplied with the package, enabling you to play Videomaster films, video clips and sequences separately from the main software and is ideal for making PD demo disks. The program can be used wither as a TTP file or a PRG file. The TTP version can b selected from the Desktop and the name of the sequence entered. The sequence is then played in a continuous loop until you press a key.
The name of an ASCII script file can also be entered in the TTP version, this then enables various effects to be used when playing the film or sequence. The PRG version can be placed in an AUTO folder along with a short ASII script file called DEMO.CON which contains information relating to the sequence, such as effects and file path.b. Remember that demos on floppy disk can only be 800K long unless you have a high density drive, this translates as about 80 frames of sound and video or 95 frames of video alone. Demos need not be made at the full 25 frames per second speed – very effective films can be made at speeds as low as six frames per second – the sound compensates for the low frame rate.
Remember, all video and TV broadcasts are covered by copyright law, so be carful out there!
If you reverse a film clip, the sound track remains unchanged, so you have to reverse it from the Audio card. You can also play back your film to see how the editing has affected the synchronisation between the sound and video.
Look at the options on that! The simple and easy to follow manual explains how to use all these options so that even a clinically insane reviewer like Clive Parker can mange to master it
The sequencer card
using this menu you can construct a sequence made up of various elements. Pre-defined film and video clips, still frames and sound samples can all be loaded into the sequencer and assigned to a key. You then play the keys in the order you want the clips to be displayed in the sequence which is then recorded. You san enhance sequences by dappling clips or playing the same clip at different points in the sequence. In this way, a final result can appear to be many times longer than the capacity of a floppy disk.
There is one drawback when you use Videomaster – the files created are huge. Think of the biggest file you can think of, double it, double it again and the multiply it by pi and you are getting close. We filled a 60MByte hard drive with files in one afternoon of ardent digitizing; each file was about 3.5Mbytes in length. As you can see from these figures, you need a hard drive and as much RAM as you can get to create the demo of your dreams – 4Mbytes of RAM get filled up in no time. Don’t despair though, a small file of about 80 frames with sound can fill a standard double density 720K floppy disk, so you should be able to cerate demos of this length with ease on a 1MByte machine.
The final analysis
Videomaster has been designed to be simple to use so anyone can learn to use it in a few short Sessions. The only other digitiser available for the ST has no audio facilities, so it cannot really be directly compared to Videomaster, it’s in a field of it’s own. In a word, unbeatable.
By Clive Parker